Lately as perhaps you know I have been doing long arm quilting...email me if you need me:> BUT I was finishing up a friend's quilt for her doing machine binding on it and trying to do a VERY neat job of it.
If you have any questions email me at m c m hunt @ w c t e l. n e t
I decided to try smoke invisible thread with a very very narrow buttonhole stitch to accomplish this. The best thing about this binding is that it appears almost invisible when its finished. It looks hand done until you really look at it.
Generally I don't like using the back as the binding. I think this is because it looks so flat on the front but with this technique it looked like a regular sewn and flipped binding. It was no longer so flat.

First you have to trim away the batting to the edge of the quilt. Be careful NOT to clip the backing while you are cutting away the batting. Then trim the back so that 1 inch is left.

Then fold it over twice...each fold is 1/2 inch.

Pin with pins toward the sewing foot so you can pull them out as you go. PIN ALOT!! I pin parallel to the binding. Be careful they will stick you as you sew!!
Getting ready to sew
Use your walking foot. It makes a smoother binding. The top thread is invisible thread - smoke. I used black on the back. If your fabric is light use the clear invisible.
Put your walking foot on and use a very narrow buttonhole stitch. It should be just wide enough to catch the binding.
It will take a little experimenting to see how narrow you can get your stitch and still catch the edge of the binding. If your machine does not have a buttonhole stitch you can also use a very narrow hem stitch for this.

TIP: When you start be sure the top edges are folded evenly!! Makes it easier to fold the corners later.

Place the binding under your foot so that the needle comes enters the fabric just to the left of the binding. You may have to fiddle with your foot placement to get this right. Mine will not work right if I put the edge of the foot on the fabric.
SEW SLOWLY...taking pins out as you go...

Sew to the corner. Clip your threads and any frayed threads. Then fold the binding on the next side...be sure to clip threads that stick out and tuck the binding edges inside as you turn the corner. This will make your corner even.

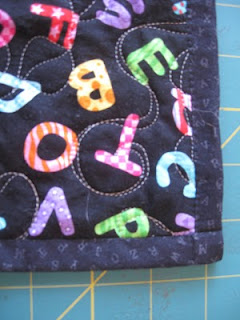
The front - Again click on the picture to see how! You can barely see the stitching. And see how neat the corner is!!

The proud owner of the quilt, Mrs. Prince. These are blocks that her kids made upon her retirement from teaching. Pam Beeler made the quilt with a little help from me.

This is the back. The teachers also wanted to get in on the good wishes so their blocks were sewn together and put on the back. It was almost like making TWO quilts!! Try figuring out how to center this on the back of the quilt.


1 comment:
That is exactly how I bind!
Post a Comment